
I’d like to preface this article by expressing my immense love and gratitude for all teachers out there who have been working diligently. Your efforts have not gone unnoticed, despite how it may seem.
You spend so much time and effort nurturing your students, ensuring that they can grow and develop into fine adults, but at what cost?
Do you often go to sleep at night with sore wrists and backs from scribbling on the whiteboard for hours?
Well, stretching can help ease your pain.
Maybe you brush it off, saying you don’t have time in the day for something as silly as stretches. But you really shouldn’t ignore the warning signs of your body.
The Dangers Of Neglecting Sore Wrists
Neglecting a seemingly small issue now will definitely lead to more problems later. This is a fact, not a belief.
The same goes for your wrists.
By ignoring the stiffness in your wrist, you are risking a visit from the “demon” known as carpal tunnel syndrome, arthritis, and tendonitis.
Carpal tunnel is a repetitive strain injury that affects not only your wrists, but your hand and forearm too—the pain can also travel up into your shoulder!
You won’t be able to move your fingers much without suffering an intense, sharp pain—so forget about writing notes on the board for your students!
With injured wrists, it will be hard for you to go about your daily routines. Even mundane tasks like picking up your mug of coffee for a sip will put strain on your wrist and cause you much pain.
Symptoms of Carpal Tunnel
Here are a few common symptoms of carpal tunnel.
- Feeling weak in your wrists—finding it hard to hold something
- A numb sensation in your wrist and hand
- A tingly feeling like your hand has fallen asleep and just woken up
- Feeling like your hand is burning
- Getting cramped fingers easily
- Searing pain in your wrists that can travel up your forearm
If you find that you feel pain and experience a number of things in this list, please seek medical assistance from your healthcare provider as soon as you can. Do not delay.
Now that you know what could happen, let’s avoid sustaining this injury in the first place.
Although ignoring your sore wrists can lead to grievous results, you can actually avoid this injury with just a few simple movements each day.
The key point is to be consistent and move your wrists frequently.
Listed here are 5 stretches to help reduce your risk of injury, help prevent avoidable injury, and ease joint pain.
5 Wrist Stretches You Can Do To Train Wrist Strength
Listed below, you will find some simple hand and wrist stretches you can do while seated on your desk to reduce the pain in your hands that come from prolonged periods of typing on a computer, writing on the whiteboard, or daily activities like driving.
These stretching and strengthening exercises can improve your range of motion, flex and extend your hand and wrist muscles, and build strength in your hand muscles.

1) Figure Eights For Wrists
This exercise increases the movement of your wrists and keep them flexible after hours of marking exam papers and writing on the board. This really loosens your hands and wrists and build wrist strength.
- While seated, place your palms together, interlacing your fingers and bring them to the front of your face.
- Keep your elbows close to your sides, and rotate your wrists in a figure eight movement, keeping your hands pressed together.
- Do full rotations—each hand will alternately be on top of each other if you do it right, and you will feel a stretch.
- Keep moving for 10 to 15 seconds.
- Rest for 10 seconds, then repeat one more time.
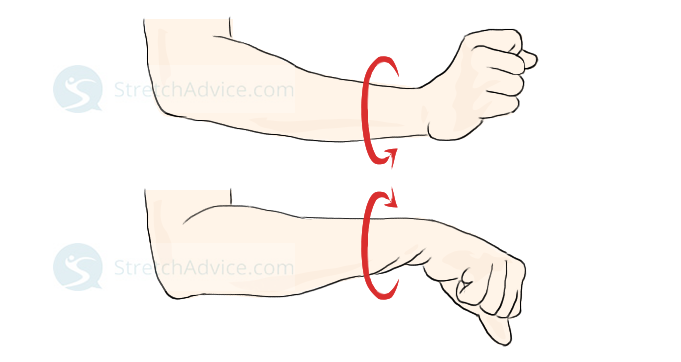
2) Wrist Rotations
Similar to the exercise above, this also targets stiff wrists, and it’ll help you regain flexibility and relieve wrist pain.
- Rest your upper arm on a table.
- Ball up your hands into fists, but don’t squeeze.
- Rotate your wrists inward like you’re drawing circles with them. You’ll feel a good stretch in your wrists as you move.
- Keep moving for 10 to 20 seconds.
- Switch the direction, rotating outward this time.
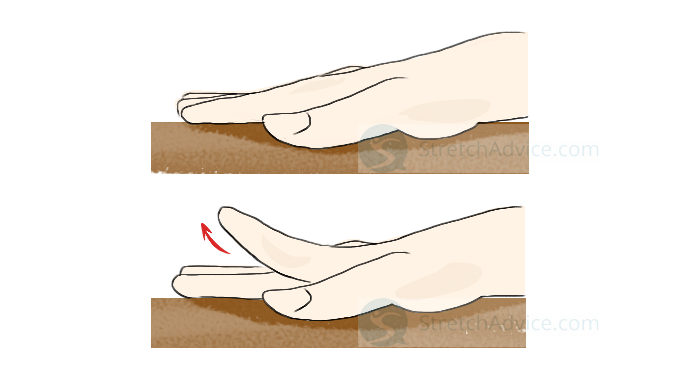
3) Finger Lifts
This relaxes the joints of your fingers, really loosening up the tight appendages.
- Place your hands on the table, spread out palms flat against the surface.
- Gently lift your fingers up one at a time while keeping the rest of your hand on the table.
- Hold for 2 to 4 seconds, then move on to the next.
- Once you’ve gone through every finger, return to the starting position and do 8 more sets!
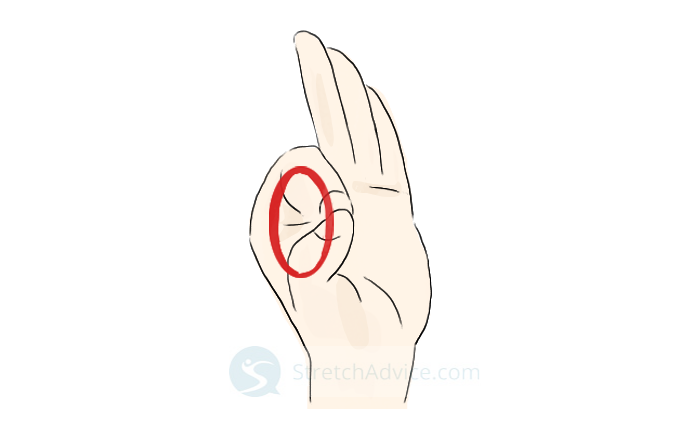
4) OK Sign
This relaxes the muscles in your thumb, which can get sore from holding and writing with a marker for too long.
- Bring your hand up to your face, keeping your wrist straightened, don’t bend your wrists.
- Make an OK sign—bring your index finger and thumb together to form a ring.
- Keep the rest of your fingers nice and straight so you’ll feel the stretch in your hand.
- Hold for a few seconds (10 to 30 seconds).
- You can do this simultaneously on both limbs or one at a time.
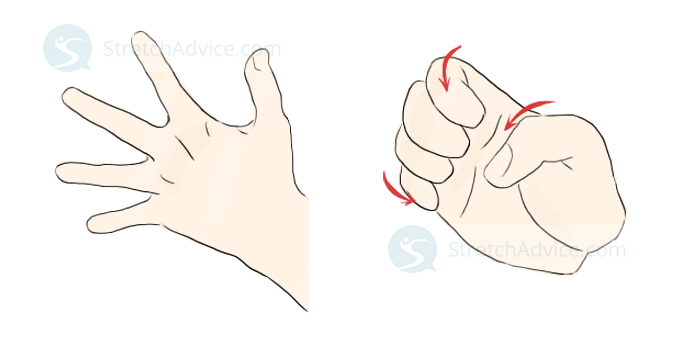
5) The Hand Claw
This make the joints in your fingers able to move again after cramping up. This is a good stretch for strength and mobility of your fingers.
- Hold out your hand in front of you with your palm facing you, spreading your fingers.
- Imagine you are a mechanical claw, flexing and gripping your fingers so your fingertips touch the base of your finger joint. Make sure that your thumb points inward too.
- Hold this position for 10 to 20 seconds each time, and repeat the movement around 3 to 4 times each limb. You can move both hands at the same time.
Bonus Stretches For Your Aching Backs
While taking care of your wrists is important, don’t forget about your poor back too!
These movements can easily be done with the support of the walls in your classroom, or teacher’s office.
You can do them in between lessons while waiting for your students to shuffle into class.
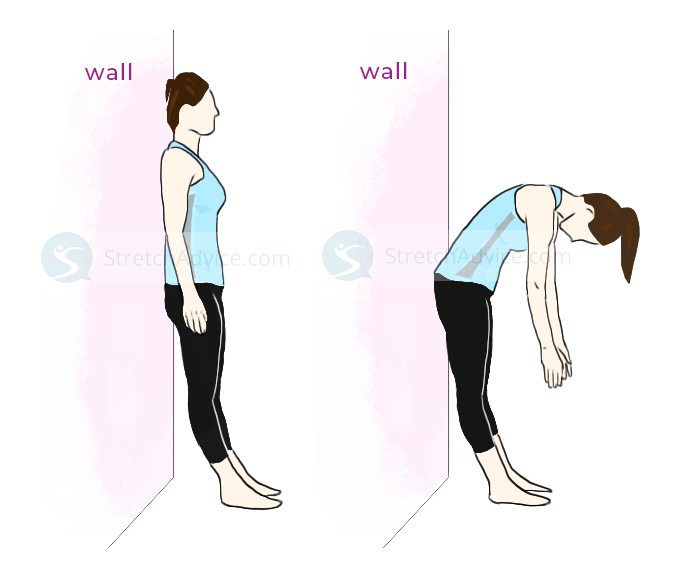
1) Wall Roll Down
This relaxes the muscles in your back and legs, and leaning on the wall means you’re removing some of the pressure on your spine and legs.
- Stand in front of the wall, pressing your back against it.
- Make sure your back is straight, and that your feet are hip-width apart before you start.
- Look down and hang your arms in front of you freely, then slowly bend your waist and lower your upper torso.
- Your fingers should be closer to the floor as you bend, so hang your fingers toward the floor.
- Hold this position for 8 to 20 seconds.
- Slowly roll yourself back up into a standing position. Take the time to really feel each section of your spine press against the wall.
- Repeat the steps again, 4 to 5 more times.
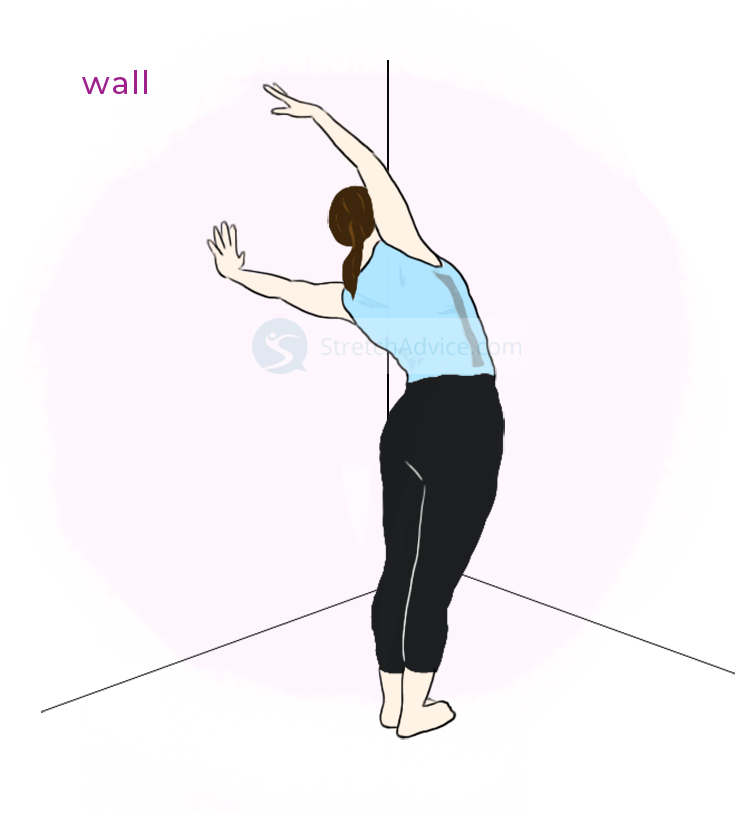
2) Supported Side Bend
This stretches out the muscles in your sides and increases your range of motion, which can get stiff after a whole day of standing.
- Stand a distance away from the wall, with your side facing it.
- Keep your back straight as you place the hand closest to the wall on it. Your arm should be extended and straight at shoulder-height.
- Raise your other arm up above your head toward the ceiling and stretch so you are reaching over to the wall.
- Move your hips slightly closer to the wall to feel a deeper stretch.
- Hold this position for 20 to 30 seconds.
- Rest for 10 seconds, then turn around and repeat on the other side.
The Takeaway
Teachers, you are the backbone of society. Don’t neglect yourself in favor of marking your students’ papers!
Do these wrists and back stretches regularly, and give your body the self-care you deserve.
Your wrists and back will love you for it!
That way, you can reduce your risk of developing painful hand or wrist medical condition that happens when you perform repetitive motions like typing and writing.
Although not listed in this article, you can also try doing the prayer stretch, where you press the palms of your hands flat against each other in front of your chest, then spread your elbows apart to help lower your hands toward your belly button. It is an effective exercise for wrist and hand stretches.
Then, there’s also the wrist flexor stretch where you use your other hand to gently pull the fingers of your hand down toward your body. You will feel the stretch from the back of the wrist to your forearm. Flip directions and pull upward to feel a good stretch in the top of your wrist to the forearm.
We take your wrist health seriously and want to ensure our content is accurate. We enforce strict sourcing guidelines when looking for effective wrist exercises you can do, so rest assured that our primary sources of wrist strengthening exercise come from peer-reviewed studies and are supported by academic research institutions.